 Documentation
Docker setup
Loading docker image
Before starting the TTS service, the current version of the docker image provided in the package distribution must be loaded locally.
To load an image, use the command:
docker load -i docker-image/techmo-tts-dnn-cpu-service-3.1.0-image.tar.gz
(Make sure that the name and image version used in the above command match those provided in the package)
Service options and configuration
Service configuration is described by environmental variables inside .env file.
Can’t see the .env file?
You must open the main service file and execute the command:
ls -la
The screen shows:
Content of the sample .env file is presented below:
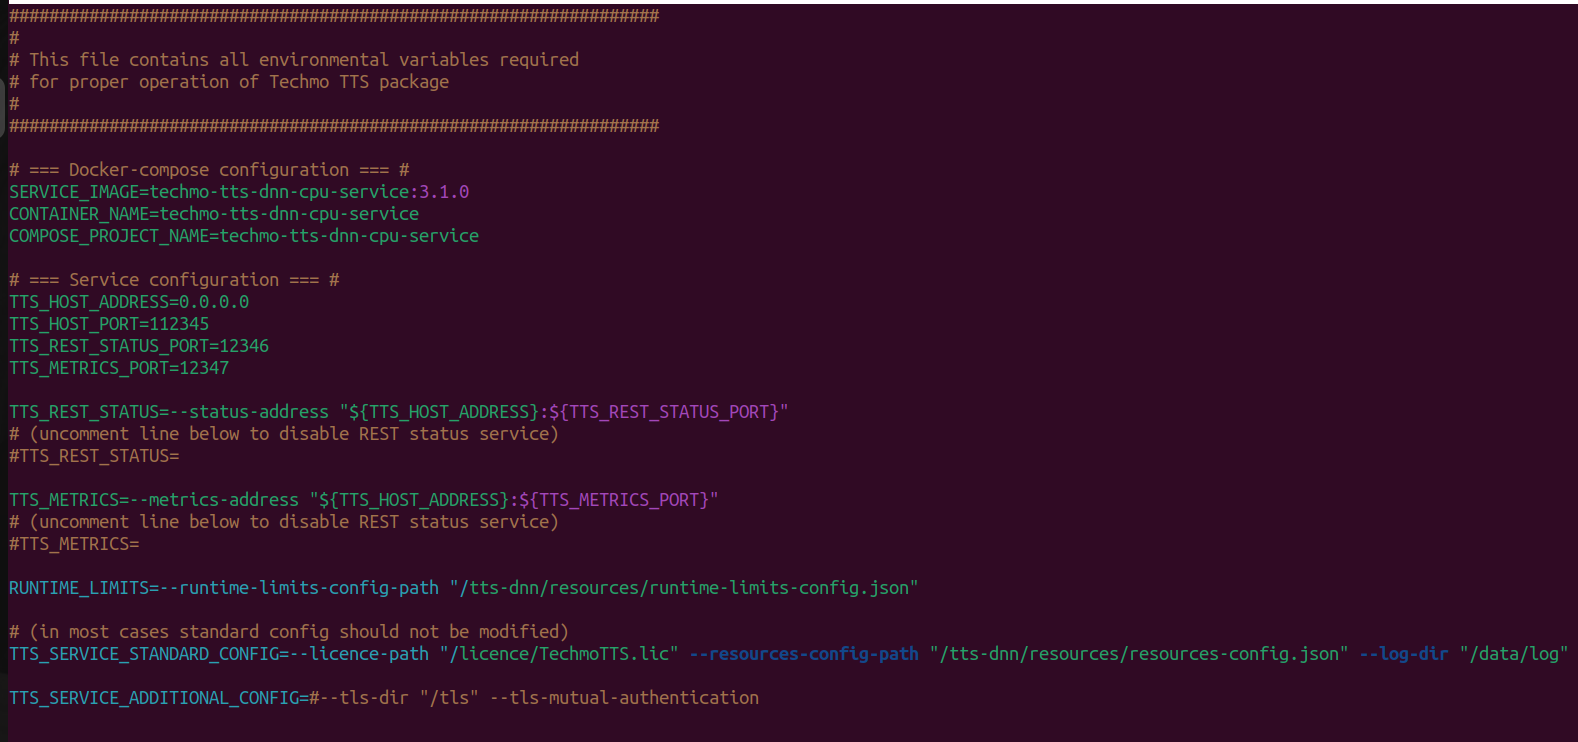
Variables description:
SERVICE_IMAGE: The name and tag of the Docker image (e.g.,
techmo-tts-dnn-cpu-service:X.Y.Z).CONTAINER_NAME: The name of the Docker container to be created. When running multiple service instances, every instance has to use a different container name.
COMPOSE_PROJECT_NAME: The name of the Docker project to be created. When running multiple service instances, every instance has to use a different project name.
TTS_HOST_ADDRESS: The IP address of the machine running the service.
TTS_HOST_PORT: The port number on which the service will be available.
TTS_REST_STATUS_PORT: The port number of the REST status interface (see Chapter 9.1. REST Status interface).
TTS_REST_STATUS: Enables/disables the REST status interface. When set to value:
--status-address "${TTS_HOST_ADDRESS}:${TTS_REST_STATUS_PORT}", the interface is enabled; when empty - disabled.TTS_CACHE: The size of the service cache in MB.
TTS_SERVICE_STANDARD_CONFIG: Standard startup options; this variable should not be edited.
TTS_SERVICE_ADDITIONAL_CONFIG: A placeholder for any additional startup options (see Chapter 5. Startup options).
Licensing data generation
Standard deployment package includes additional Docker Compose startup configuration for licensing data generation inside the generate-licence-info.yml file. Such configuration can be used to generate the licensing data as shown below:
docker-compose -f generate-licence-info.yml up
Received output should be similar to this one:
techmo-tts-dnn-cpu-service-3-1-0 | Techmo TTS DNN CPU Service, version 3.1.0.
techmo-tts-dnn-cpu-service-3-1-0 | Copyright (C) 2023 Techmo sp. z o.o.
techmo-tts-dnn-cpu-service-3-1-0 |
techmo-tts-dnn-cpu-service-3-1-0 | ==========BEGIN OF LICENCE PARAMETERS==========
techmo-tts-dnn-cpu-service-3-1-0 | {
techmo-tts-dnn-cpu-service-3-1-0 |     "application-id": "TTS",
techmo-tts-dnn-cpu-service-3-1-0 |     "application-version": "3.1.0",
techmo-tts-dnn-cpu-service-3-1-0 |     "container-id": "techmo-tts-dnn-cpu-service-3-1-0",
techmo-tts-dnn-cpu-service-3-1-0 |     "instance-ip": "0.0.0.0",
techmo-tts-dnn-cpu-service-3-1-0 |     "instance-port": "12345",
techmo-tts-dnn-cpu-service-3-1-0 |     "licence-key-id": "Ex/3raXDDehgLTQbFXW4XerIXEi1qH5rpNeLSagZk=",
techmo-tts-dnn-cpu-service-3-1-0 |     "licence-version": "3",
techmo-tts-dnn-cpu-service-3-1-0 |     "machine-id": "veXohm23suR1bER+3yTH3dm3AA6lm10tpAotDerOvts="
techmo-tts-dnn-cpu-service-3-1-0 | }
techmo-tts-dnn-cpu-service-3-1-0 | ==========END OF LICENCE PARAMETERS==========
The above data should be sent to the Techmo team via email in order to generate an individual licence valid on the customer’s machine. Received file should be placed in the licences directory. To remove the container created during data generation process, use:
docker-compose -f generate-licence-info.yml down
TLS authentication
To protect server-client communication, a TLS secure connection can be used. The section below describes how to do it in several simple steps.
Creating certificates and keys
OpenSSL is needed to create the TLS certificates. OpenSSL can be installed using command:
sudo apt-get install openssl
Create separate directory for tls files:
mkdir tls && cd tls
Create keys and certificates. In the commands below replace the password phrase with a secure password (for detailed information check out the openssl documentation).
Generate CA private key:
openssl genrsa -passout pass:password -des3 -out ca.key 4096
Generate self signed certificate:
openssl req -passin pass:password -new -x509 -days 365 -key ca.key -out ca.crt -subj "/C=PL/CN=Root CA"
Generate server RSA private key:
openssl genrsa -passout pass:password -des3 -out server.key 4096
Generate server certificate: (in the command below replace “localhost” with the domain’s common name)
openssl req -passin pass:password -new -key server.key -out server.csr -subj "/C=PL/CN=localhost"
openssl x509 -req -passin pass:password -days 365 -in server.csr -CA ca.crt -CAkey ca.key -set_serial 01 -out server.crt
Remove passphrase from the server key:
openssl rsa -passin pass:password -in server.key -out server.key
Generate valid client key:
openssl genrsa -passout pass:password -des3 -out client.key 4096
Generate client certificate:
openssl req -passin pass:password -new -key client.key -out client.csr -subj "/C=PL/CN=localhost"
openssl x509 -passin pass:password -req -days 365 -in client.csr -CA ca.crt -CAkey ca.key -set_serial 01 -out client.crt
Remove passphrase from client key:
openssl rsa -passin pass:password -in client.key -out client.key
To perform mutual authentication, client application will need access to the ca.crt, client.key and client.crt, other files should stay on the server side.
Startup configuration with TLS
To run the service with TLS support enabled, a couple of changes have to be done in the configuration. Extend the volumes section in the docker-compose.yml file with tls directory:
services: tts-dnn: […] volumes: […] - “./tls:/tls”
Save and close docker-compose.yml file. Enable TLS authentication through the ASR_ADDITIONAL_CONFIG variable in the .env file:
ASR_ADDITIONAL_CONFIG=[...] --tls-dir=/tls --tls-enable-mutual-authentication
Save and close .env file. After completing the above steps, service can be started using docker-compose up -d command. If service instance is already running, to apply the changes and enabe the TLS encryption, restart is required.
Starting the Service
After completing the configuration and placing the licence in the correct directory, service can be started using the following command:
docker-compose up
To run the Docker container in the background, additionally use the -d (–detach) option:
docker-compose up -d
This will allow the service to remain running after closing the current terminal window
In order to access container’s logs, use the following command:
docker logs ${CONTAINER_NAME}
To terminate the service, use the following command:
docker-compose down